Monday, November 23, 2015

All I want for Christmas is...Splurge Worthy

Splurge Worthy Gifts
AG Adriano Goldschmied  | Soia Kyo down coat | Eberjey pajamas | Tory burch tote | Anna Beck evil eye jewelry | Clarisonic face cleanser | Joanna Laura Constantine ear cuff | Dolce Vita boots | Lele Sadoughi choker necklace | Christian Louboutin matte lipstick

Having a hard time finding the perfect gift for that special someone?  Mulling over the idea of either a pole dancing elves sweater or a the newest wine rack flask bra?  Well fear no more!  Over the next month I will be posting a series of gift giving guides with all different price points.  This one just so happens to be splurge worthy :).  Trust me these gifts would make anyone happy to have waiting under the tree come Christmas morning.  Happy Holidays!


Friday, November 20, 2015

Faux Fur and Fall


Over-the-knee Boots | here or here
Faux Fur Vest | here or here
Necklace | here 
Bracelet | here
Faux Leather Leggings | here
T-shirt | here

Monday, November 16, 2015

Mirco-needling away the wrinkles


Micro-needling is a fairly new beauty craze that has been popular with celebrities like Jennifer Aniston, Kim Kardashian and Angelina Jolie.  This revolutionary treatment is also referred to as Collagen Induction Therapy (CIT) and consists of a roller with hundreds of very fine needles.  

The concept behind micro-needling is that by punching tiny holes in the skin (sounds fun, right?) you stimulate collagen growth.  I first heard about this new beauty regimen while watching the The Doctors' Show (click here) and wanted to give it a try.  I did my research on what brands of derma rollers are the best and which size needles to use for the various skin areas you are trying to treat. Micro-needling is said to reduce the appearance of scars and wrinkles.  The average derma roller costs anywhere between $20-$40 which makes this beauty treatment possibly the cheapest wrinkle reducer out there.  I wanted to try it around my eyes so I got this derma roller (click here) and consulted with a certified esthetician on how to properly use it.  

How To Micro-needle:

First wash your face making sure to get rid of any makeup, lotions or oil and pat dry. Gently roll the derma roller over your target area in all different directions, making sure not to press too hard.  It is slightly uncomfortable and kind of hurts so if this is too much to bare you can always buy an over the counter numbing cream to put on beforehand.  Once your finished with your treatment use a high quality eye and face cream.  By applying a high quality product after micro-needling it allows your product to absorb better.  My favorite are Obagi ELASTIderm and Bobbi Brown Extra Repair.  I would suggest micro-needling only once a week because you could irritate the skin and cause damage.

One of the most important things when micro-needling is cleaning the roller.  If not cleaned properly you can get all sorts of infections so this is a must!  It's fairly simply, just pour 75% alcohol into the derma roller storage container or in a small cup.  The whole roller should be submerged for about an hour.  Then, run it under hot water and towel dry. 

Happy Micro-needling!


Sunday, September 27, 2015

70's Style Love


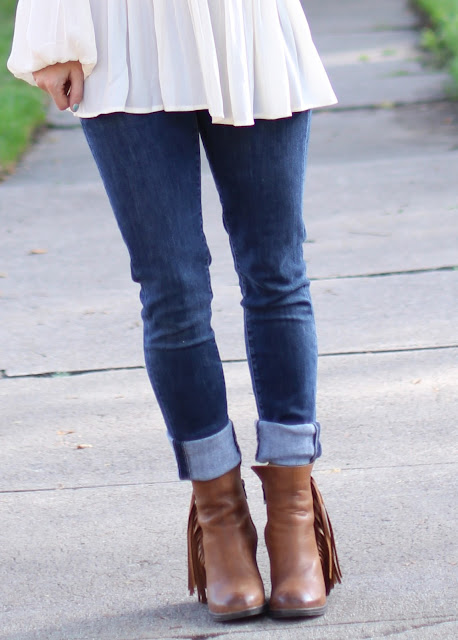
I love fall because with the changing of the leaves means booties, skinny jeans and this year flowy 70's blouses.  I have to say this stylish trend is one that I'm obsessing over.  It's not only casual, but also super comfortable.  The brown leather fringe booties are also on sale!  Happy Shopping :)


Sunday, September 20, 2015

Camo Inspiration

Camo Inspiration


Clockwise: Monrow Camo Hoodie | Monrow Rock T-Shirt | True Religion Camo Pants | True Religion Stretch Pants | Banana Republic Camo Jacket | Carrera Sunglasses | Sam Edelman Slip-On | Dorothy Perkins Vest | Banana Republic Camo Utility Shirt


Lashing Out


I've always loved lashes, but always struggled with putting them on.  In the past, I have tried eyelash extensions and have found that they are not only costly, but very high maintenance.  On my search to find the perfect lash I ran across a few great options that I thought I would share.  Here are some tips and tricks of the trade.


Cluster Lashes

The Kiss Ever Ez Lashes is great and the easiest style to use for a beginner wanting to apply lashes.   The lash lengths come in short, medium and long (maybe extra long too).  The shortened strips and various lash lengths allows for easy application and a customizable look.  I usually only use about three to four clusters per eye (Note: my eyes are small).   I want my eyes to seem larger so I focus on the outer parts of my eye, but you can apply them across the entire eye or layer them for a more dramatic look.

After applying my eyeshadow, eyeliner and mascara, I put a small amount of lash glue in the glue pocket.  I then pick up one of the long length clusters with my tweezers and put a small amount of lash glue on it.  I wait about 30 seconds for the glue to become tacky and then place it on the outside of my eyelid.  I repeat the same process moving towards the middle of the eye however, this time I use two medium lengths and place them right next to each other.  Lastly I place the short cluster next to the medium, this is usually about the middle of the eyelid.  To adjust each cluster gently use your finger or tweezers to position it correctly, making sure to put each one on the the lash line and not the skin.

Accent Lashes
The Ardell Accents Lashes are fairly easy to use as well.  The shortened strip allows for more control compared to the full strip lashes.  This type of lash is just placed on the outside corner of your eye with your tweezers and then you can repositioned them gently with your fingers.

Full Strip

Another option is to take your favorite full strip eyelashes and cut each strip into three or four sections.  These shown above are the Ardell Wispies.  By cutting the strips into clusters you can then apply just like the Kiss Ever Ez Lash.  When cutting them try to make sure each cluster is the same size.  

So there you have it!  A few methods that I've picked up along the way in finding the best lash brands with the easiest application.

Happy Lashing :)

Monday, September 7, 2015

Fall Favorites

Fall Favorites


Here are a few things that I'm loving for fall.....shop the looks below!

Fall Favorites 

Friday, September 4, 2015

Acai Blueberry Moscow Mule


My new found love is a Acai Blueberry Moscow Mule served in a copper mug of course.  This drink is not only refreshing, but a sure hit at any party.  

With ingredients like blueberry, acai and mint this recipe has an added bonus, antioxidants.  Because who doesn't love antioxidants in their alcoholic beverages!

Although there are a variety of recipes out there, I have found that the key to a great mule is the ginger beer (and a colorful paper straw :)).  The thing about ginger beer is that it can be really spicy and almost over power your ingredients so its important to find one that isn't too strong.  The best ginger beer to buy is an Australian brand called Bundaberg Ginger Beer.  In addition, when creating the perfect moscow mule you must have fresh and quality ingredients.  I have listed below what I used.

Acai Blueberry Moscow Mule

Ingredients:

4 Copper MugsMuddler and bowl1 Lime
1 jar of Blueberry Preserves (I got mine from Harry & David)
6-pack of Bundaberg Ginger Beer
1 bottle Vincent Van Gogh Acai-Blueberry Vodka
A bundle of mint leaves
Fancy paper straws

Directions for 1 Mule (lazy girl measurements):  In a small bowl muddle together a lime slice, a few mint leaves and a spoonful of blueberry preserves.  Then grab your copper mug and fill halfway with ice and do a three count pour of the Vincent Van Gogh Acai-Blueberry Vodka (or more for those who like a strong drink).  After that pour your ingredients from the bowl (mint, blueberry preserve and lime) in the mug and fill to the brim with the Bundaberg Ginger Beer.  Garnish with a few mint leaves and a fancy straw and you've just made your first Acai Blueberry Moscow Mule.  

Enjoy!


Sunday, August 30, 2015

Get the Perfect Makeup Look for Fall


Fall is here which means flared jeans, fringe boots and new trends for makeup.  This fall the trend is all about the natural look with flushed cheeks, bronzy eyes and a berry lip.  I've gathered the must-haves of the season to keep you looking fresh and up with the trends.

Cheeks:  The flushed cheek look is really popular right now and I am loving this one!  My favorites are Nars Orgasm and Hourglass Ambient Lighting Blush in Luminous Flush - Champagne Rose. Both of these blushes will give you the perfect cheeky look.

Face:  For the overall face its a foundation that looks natural and like you are wearing nothing.  A great light coverage foundation is Hourglass Illusion Skint Tint, for a medium coverage use YSL 'Youth Liberator' Serum Foundation, and for a full coverage the Estee Lauder Double Wear Foundation (this is what I currently use).

Eyes: Bronzy eyes are the trend this fall and a bold graphic liner.  My favorite eye shadow palette for fall is Too Faced Semi Sweet Chocolate Bar.  This palette has rich cocoa powdered-infused matte and shimmer shades from warm caramel, deep mochas, bronzy chocolate hues and a pop of sugared blueberry.  For a liner I would go with either Eyeko Skinny Liquid Liner or Stila Stay All Day Waterproof Liquid Liner.  Both of these liners are really easy to use and this is coming from someone who has always struggled perfecting the cat-eye look.

Lips:  The color berry and a natural lip is all the rage.  The perfect berry colored lip is YSL Volupte Sheer Candy Gloss Balm in Mouthwatering Berry.  This lip gloss is great because it isn't too bold and moisturizing.  For a more natural color I like Anastasia Beverly Hills Liquid Lipstick in Pure Hollywood.

Friday, August 21, 2015

Foams, Sprays, Bronzers, and Lotion Oh My: Self Tanner Reviews


Winter is near!  Well actually fall, but around here (Colorado) that can mean cold and most importantly days without the sun shining ahhhhhhh.  I use self-tanners all year round and have tried almost every product out there.  I guess I would consider myself a tanning lotion expert or maybe just someone who looks better tan :)  I wanted to do a review because there are so many different types of self-tanning products out there like....olive base, foams, sprays, bronzers, gel, lotions, self-tan towels and so on.  I'm going to fill you on what works and how to get that natural overall glow all year round.

Xen-Tan:  This is actually one of my favorite self-tanners that you can buy online at Nordstroms.  The reason why I like Xen-Tan is because it is an olive base which doesn't leave you with an orange skin tone.  It also has shea butter in it that moisturizes your skin and smells amazing.  I usually apply it in the morning after exfoliating my face and have a nice glow the rest of the day.

MD Face: MD Face is recommended by some of the top plastic surgeons and dermatologists in the world.  MD Face is probably my favorite spray self-tanner because it develops over time and looks really natural.  It gives you an all over healthy glow and doesn't streak.  I also think it lasts longer than other tanning products. You can get this self-tanner online at So You Boutique.

St. Tropez Self Tan Bronzing Mouse:  This product seems to be the most popular self-tanner on the market and has gotten rave reviews at Sephora.  However, I have found that this mouse is pretty hard to use and dries very quickly which means it can streak easy.  It also was very drying to my skin and I didn't like the smell. Using the mitt is imperative when applying this self-tanner which can provide a more even application.

Vita Liberata (phenomenal 2-3 week tan lotion): The Vita Liberata tanning lotion has a nice color to it, but make sure to get the mouse!  I unfortunately bought the lotion which dries quickly and is hard to apply evenly.  On the bottle it claims to last for 2-3 weeks, but my tan has only lasted a week max.  This brand is also available at Sephora.

So there you go!  Now you can head into fall without skipping a beat.


Sunday, August 9, 2015

Vacay in Aussie Land: Part 1


Although I've only visited Australia once I feel like I did everything and anything in a short amount of time.  I shopped, ate, went sight seeing and ate again.  Lucky for me Melbourne had all of that to offer and much much more.

- Zurouna - I know I may be a little bit partial (this is my boyfriend's mothers restaurant), but this place has the best Lebanese food in town.  For appetizers we had the dip platter (in the photo below), lamb sharwarma and haloumi cheese sambousik.  I think my favorite was the haloumi cheese sambousik which kind of looked like an egg roll that was filled with cheese.


Point King Beach - This beach was really pretty and secluded.  It felt like we had our own personal beach due to only a few other beach goers out and about.  After a day at the beach make sure to head to the town square for great food and local shops.


Healesville Sanctuary - The Healesville Sanctuary was probably one of the best zoos I have ever been to partly because of their different animal encounters that they offered.  We of course chose to feed the kangaroos.  I was really surprised at how friendly they were.  They would grab your arm for more corn which was some what scary at first!  This little fury baby below was named Crystal.


Ludlow Bar and Dining Room - Is on the banks of South Yarra, Melbourne right next to the water.  This restaurant has a great atmosphere and in the perfect location.  The food is really unique and something that you won't be able to get anywhere else.  We decided that we would share a few different small plates and have one main dish.  The dish below is the Tea Poached Celtic Scallop Iberico Gran Reserva which was my favorite.  We also had the Grilled Southern Octopus and the Roast Morton Bay Bug.


Peninsula Hot Springs - This natural hot springs was one of the prettiest places I've ever been.  The views are spectacular and you can see for miles and miles.  On top of that they have a variety of different types of pools like an underground sauna, hydrotherapy pool, cave pool and even a reflexology walk.


Stay tuned for part 2!


Thursday, July 23, 2015

A Baby Story: Gender Neutral Baby Shower

This past weekend we put on a baby shower for one of our good friends!  There was one catch however, this shower was gender neutral which proved to be harder than one would think.  My sister decided on "A Baby Story" as being the theme and it turned out so cute.  Here is our version of "A Baby Story".  Make sure to scroll down all the way to the bottom to find out where you can purchase all of these adorable decorations.

Flowers: Trader Joes  Storybook Paper: Random Paper  Bookmarks: Lasercrafters  
Book Letter: DimesStoreVintage  Picture Frame: Hobby Lobby


Thursday, June 11, 2015

DIY Whimsical Nursery


When my sister found out she was expecting a little girl she began to look at ideas for the nursery.  She soon settled on a her own twist of a whimsical design.  The flowers she made by hand and each one took about 20 minutes to complete!  She found the idea off of Pinterest, but completely made it her own.  Hope you enjoy all the photos and get some great ideas :).


 Picture: Wishful Thinking Shoe: JaxHoo  Chandelier: IKEA  Wall Art: UrbanWall


Sunday, May 17, 2015

How to make a statement


A statement necklace is all you need to make an outfit go from casual to a night out on the town.  Here are just a few of my favorite necklaces that are sure to make a statement :)